1. Introduction
This document is intended for Techila Distributed Computing Engine (TDCE) End-Users who are using Julia as their main development environment. If you are unfamiliar with the terminology or the operating principles of the TDCE technology, information on these can be found in Introduction to Techila Distributed Computing Engine.
The structure of this document is as follows:
Introduction contains important information regarding the installation of required Julia packages that enable you to use TDCE with Julia.
Julia @cloud Macro Overview introduces the @cloud macro parameters, which can be used to perform computations in TDCE. Each parameter also includes a short standalone code snippet that can be executed to see how the parameter affects the computations.
Code Examples contains walkthroughs of code samples that use the @cloud for macro. The example material includes code samples on how to control which work space variables are transferred as well as how to transfer additional data files to the Techila Workers.
Screenshots in this document are from a Windows 10 operating system. The appearance of screens may vary, depending on your Julia version, operating system and display settings.
|
Note
|
Techila @cloud functionality is not thread safe, meaning accessing @cloud functionality from multithreaded applications is not recommended.
|
1.1. Managing Required Package
In order to use the TDCE Julia API, the following Julia package need to be installed:
-
Techila
Instructions for installing the package can be found in Installing the Techila Package.
1.1.1. Installing the Techila Package
The Techila package is included in the Techila SDK and contains TDCE Julia functionality.
Please follow the steps below to install the Techila package.
-
Launch a command prompt and change your current working directory to the
techila/lib/juliadirectory in the Techila SDK. -
Install the
techilapackage by executing the following command in your command prompt:julia install.jl
The
techilapackage is now ready for use. You can verify that the package was installed correctly by starting Julia and importing the package using the following command:using Techila
1.1.2. Updating the Techila Package
The Julia package can be updated by installing the new version of the package as described in Installing the Techila Package. This will overwrite the old files, updating the package.
1.2. Example Material
The Julia scripts containing the example material discussed in this document can be found in the following folder in the Techila SDK:
-
techila/examples/julia/cloudfor
This folder contains subfolders, which in turn contain the actual Julia scripts that can be used to run the examples. Please see Code Examples for walkthroughs of the examples.
1.3. Naming Convention of the Julia Scripts
The typical naming convention of Julia scripts presented in this document is explained below:
-
Julia scripts beginning with
run_contain the distributed version, which will perform the computations in your Techila Distributed Computing Engine environment. -
Julia scripts beginning with
local_contain locally executable code, which does not communicate with the TDCE environment.
Please note that some Julia scripts and functions might be named differently, depending on their role in the computational Project.
2. Julia @cloud Macro Overview
The @cloud macros provides a simple way to distribute computationally intensive for-loop structures to the TDCE environment. The screenshot below illustrates how this can be done when working with a very simple for loop.
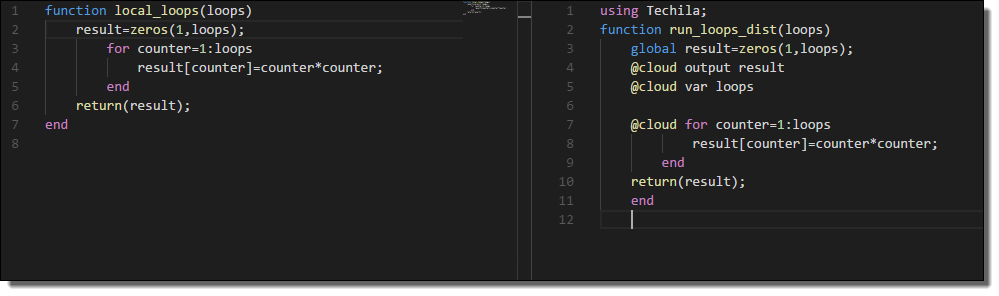
for-loop structures to @cloud for-loop structures enables you to execute the computationally intensive operations in the Techila Distributed Computing Engine environment.The loop structure is distributed and executed on Techila Workers adding the @cloud macro next to the for loop that you want to execute in Techila Distributed Computing Engine. Additionally, input and output arguments will need to be prefixed with suitable @cloud macros.
By default, the number of Jobs in the Project will be automatically set to match the number of iterations in the loop. For example, if the local for loop consists of 200 iterations, then the Project will consists of 200 Jobs. Each of these Jobs will execute one iteration.
In situations where the individual iterations are not that computationally demanding, but there is a very large amount of these iteration, then performance can be improved by processing multiple iterations in each Job. The amount of iterations performed in each Job can be controlled with the stepsperjob parameter.
Please note that iterations of the @cloud for-loop will be performed simultaneously on different Techila Workers, meaning all computational operations must also be independent. For example, the conversion shown below is possible, because all the iterations are independent.
| Locally Executable | Distributed Version |
|---|---|
|
|
But it is NOT possible to convert the loop structure shown below. This is because the value of A in the current iteration (e.g. i=3) is used as an input argument in the next iteration (i=4).
| Locally Executable | Distributed Version |
|---|---|
|
Conversion NOT Possible. Recursive dependency in the local |
It is also possible to evaluate regular for-loop structures inside @cloud for-loops. For example, the syntax shown below would evaluate the innermost for-loop (j in 1:10) in each Job.
using Techila;
loops=10;
@cloud reset
global result=zeros(1,loops);
@cloud output result
@cloud var loops

@cloud for outer=1:loops
  for inner=1:loops
    result[outer,inner]=outer*inner+1;
  end
end
In situations where the loop structures are perfectly nested, it is also possible to replace the innermost for loops with a @cloud for loop. Example of this below.
using Techila;
loops=10;
@cloud reset
global result=zeros(1,loops);
@cloud output result
@cloud var loops

# This will also work.
@cloud for outer=1:loops
  @cloud for inner=1:loops
    result[outer,inner]=outer*inner+1;
  end
end
However, if the loops are not perfectly nested (meaning there is code between the @cloud for loops), you cannot use multiple levels of @cloud for loops. Example of a non valid syntax below.
# This will NOT work
@cloud for ...
  <any code here> # Code between @cloud for -statements is not allowed.
  @cloud for ...
    <more code here>
  end
end
General information on available control parameters can also be displayed by executing the following command in Julia.
using Techila
@cloud help
Please note that @cloud for should only be used to distribute the workload in computationally expensive for-loops. If you have a small number of computationally trivial operations, using @cloud will not improve performance.
As an exception to this rule, most of examples discussed in this document will be relatively simple, as they are only intended to illustrate the mechanics of using @cloud macros.
When processing computations in Techila Distributed Computing Engine, the following keywords are supported by the @cloud macro.
2.1. @cloud for
@cloud for is used to mark for loop iterations to be executed in Techila Distributed Computing Engine.
For example, the following syntax could be used to create a Project consisting of 10 Jobs. Each Job would consists of one iteration, where the value of the iteration counter would be squared. After the Project has been completed, results will be available in the result variable.
using Techila
@cloud reset
loops=10;
global result=zeros(1,loops);
@cloud output result
@cloud var loops

@cloud for counter=1:loops # Execute this in Techila.
  result[counter]=counter*counter;
end
2.2. @cloud <callback> for
Callback functions can be used to post-process individual Job results as soon as they have been received from the Techila Server. The general syntax for using a callback function is shown below:
# Code
@cloud <function_name> for counter=1:loops
# More code
In the above code snippet <function_name> notation should be replaced with the name of your callback function. For example, if your callback function is named cbfun, then the syntax shown in the code snippet below could be used.
using Techila

function cbfun(jobresult)        # Define the callback function
    println(jobresult["result"]) # Print the value of 'result' returned from each Job.
    return(jobresult)            # This value will in turn be returned by @cloud for
end

@cloud reset
loops=10;
global result=zeros(1,loops);
@cloud output result
@cloud var loops

@cloud cbfun for counter=1:loops # Execute this in Techila.
  result[counter]=counter*counter;
end
In the code snippet shown above, the function cbfun is used as the callback function. The function takes one input argument and will be automatically executed each time a new Job result is received. Callback functions must always have a signature which takes exactly one (no more, no less) input argument. The value for this input argument will be a Dict, which contains all values returned from the Job. In the example above, @cloud output result has been used to define that variable result should be returned. This means that the callback function, argument jobresult will be a Dict containing a key result, which contains the actual result returned from the Job.
The value returned by the callback function will in turn be returned by the @cloud for loop. In the example snippet above, the input argument jobresult variable will returned without making any changes to it. As no changes are made to the value, this means that the result returned by @cloud for will be formatted similarly as it would be if no callback functions would be used.
2.3. @cloud param
@cloud param is used to enable additional features in the Techila Distributed Computing Engine system. Includes support for the following parameters:
2.3.1. detach
@cloud param detach=true can be used to disconnect from the Techila Server after creating a Project. This will free up your Julia session for other purposes while the computational Project is processed in Techila Distributed Computing Engine.
using Techila
@cloud reset
loops=10;
global result=zeros(1,loops);
@cloud output result
@cloud var loops
@cloud param detach=true

@cloud for counter=1:loops
  result[counter]=counter*counter;
end
After creating the Project, the Project ID number will be printed to your Julia console. You can check the Project’s progress from the Techila Web Interface by using your web browser.
After the Project has been completed, results can be downloaded by using the projectid parameter in combination with your Project ID number.
2.3.2. projectid
@cloud param projectid=<Pid> can be used to connect to a previously created Project. Replace <Pid> with your Project ID number. The example code snippet below would connect to Project 201 and download the results. Please note that results can only be downloaded if they have not been deleted from the Techila Server. By default, results will be automatically deleted after they have been downloaded. If you need to prevent Project results from being deleted from the Techila Server, this can be done by defining the removeproject parameter when creating the Project.
using Techila
@cloud reset
loops=10;
global result=zeros(1,loops);
@cloud output result
@cloud var loops
@cloud param projectid=386

@cloud for counter=1:loops
  result[counter]=counter*counter;
end
2.3.3. removeproject
@cloud param removeproject=false will prevent the Project results from being deleted from the Techila Server even after downloading the results. Setting this parameter is useful if you know that you want to re-download the results at a later time.
using Techila
@cloud reset
loops=10;
global result=zeros(1,loops);
@cloud output result
@cloud var loops
@cloud param removeproject=false

@cloud for counter=1:loops
  result[counter]=counter*counter;
end
2.3.4. stepsperjob
@cloud param stepsperjob=[csv list of iteration counts] can be used to define how many iterations are executed per Job. By default (ie. when this parameter is not used), one iteration will be performed per Job. Setting this parameter is useful if individual iterations of your for loop execute quickly, as this parameter allows executing multiple iterations in each Job, which in turn will improve performance. The example code snippet defines that two iterations will be performed in each Job, resulting in a Project consisting of 5 Jobs (because there are 10 iterations in total).
using Techila
@cloud reset
@cloud param stepsperjob=[2]
loops=10;
global result=zeros(1,loops);
@cloud output result
@cloud var loops
@cloud for counter=1:loops
  result[counter]=counter*counter
end
In situations where there are multiple perfectly nested @cloud for loops, the iteration counts for each loop can be defined as a comma separated list as shown in the code snippet below. The order in the comma separated list is from the outermost to the innermost @cloud for loop. In the example below, this means that the first value 3 affects @cloud for c1=1:loops_x, second value 2 affects @cloud for c2=1:loops_y and last value 1 affects @cloud for c3=1:loops_z. The number of Jobs in the example Project would be 350 (Formula used: ceil(20/3)*ceil(10/2)*ceil(10/1) = 350).
using Techila
@cloud reset
@cloud param stepsperjob=[3,2,1]
loops_x=20;
loops_y=10;
loops_z=10;
global result=zeros(loops_x,loops_y,loops_z);
@cloud output result
@cloud var loops_x
@cloud var loops_y
@cloud var loops_z
@cloud for c1=1:loops_x
  @cloud for c2=1:loops_y
    @cloud for c3=1:loops_z
      result[c1,c2,c3]=c1*c2*c3
    end
  end
end
2.3.5. inifile
@cloud param inifile='<techila_settings.ini file location>' can be used to ensure that the system finds techila_settings.ini file in situations where it is stored in a non-standard location. For example, the following code syntax could be used when the path to the file is C:\temp\techila_settings.ini. Please note that double backslashes are needed when defining the value of the parameter using a path that contains backslashes.
using Techila
@cloud reset
loops=10;
global result=zeros(1,loops);
@cloud output result
@cloud var loops
@cloud param inifile="C:\\temp\\techila_settings.ini"

@cloud for counter=1:loops
  result[counter]=counter*counter;
end
2.3.6. quiet
@cloud param quiet=true can be used to suppress ALL Techila Distributed Computing Engine Julia console output when performing computations in Techila Distributed Computing Engine. The example code snippet below shows how this parameter can be enabled.
using Techila
@cloud reset
loops=10;
global result=zeros(1,loops);
@cloud output result
@cloud var loops
@cloud param quiet=true

@cloud for counter=1:loops
  result[counter]=counter*counter;
end
2.4. @cloud exec
@cloud exec is used to execute Julia statements on the Techila Worker before the actual computational code inside the @cloud for loop is executed. This is illustrated in the image below.
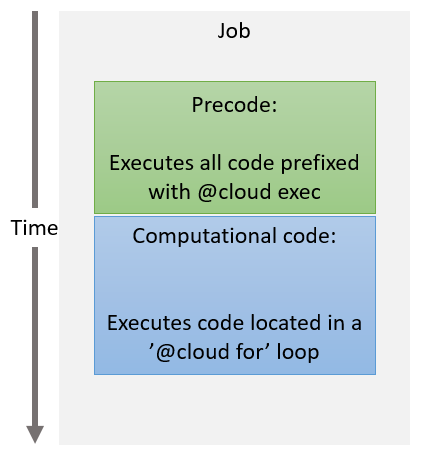
One particularly useful application for the @cloud exec macro is to make functionality in Julia packages available on the Techila Workers. Whenever you execute @cloud exec using <package> statement, the package defined in <package> will be automatically transferred from your computer to all Techila Workers participating in the Project. After the package has been transferred, the Techila Worker will import the package with a using <package> statement, meaning you will be able to use functionality included in the <package> during your computational code.
For example, the following code snippet shows how to use the StatsBase package in the computational code.
using Techila
@cloud reset
loops=10;
global result=zeros(1,loops);
@cloud output result
@cloud var loops
@cloud exec using StatsBase

@cloud for counter=1:loops
  result[counter]=StatsBase.rand(1)[1];
end
Multiple packages can be listed as by defining them as a comma separate list:
@cloud exec using Distributions, StatsBase, Interpolations, Dierckx2.5. @cloud file
@cloud file can be used to transfer additional files from your computer to the Techila Workers. The following syntax would transfer file file1.txt to the Techila Worker.
using Techila
@cloud reset
loops=10;
global result=Array{Array}(10,1);
fill!(result, [""]);
@cloud output result
@cloud var loops
@cloud file "file1.txt"

for counter=1:loops
  # Code checking that we actually see file1.txt on the Techila Worker
   result[counter] = readdir()
end
Multiple files can be transferred by listing each file on a separate line and prefixing it with the @cloud file macro. The example syntax shown below could be used to transfer files file1.txt, file2.txt and file3.txt to the Techila Worker.
using Techila;
@cloud reset
loops = 10;
global result = Array{Array}(10,1);
fill!(result, [""]);
@cloud output result
@cloud var loops
@cloud file "file1.txt"
@cloud file "file2.txt"
@cloud file "file3.txt"

for counter=1:loops
  # Code checking that we actually see all files on the Techila Worker
   result[counter] = readdir()
end
2.6. @cloud var
@cloud var can to be used to make local variables also visible on the Techila Workers. In the following example, variables a, b and loops are transferred. Please note that the variable used to define the dimension of the for loop (loops in the example) will always need to be prefixed with the @cloud var macro.
using Techila;
@cloud reset
loops = 10;
global result=zeros(1,loops);
@cloud output result
@cloud var loops
@cloud var a=1
b = 4;
@cloud var b
@cloud for counter=1:loops
  result[counter]=counter*counter+a+b;
end
2.7. @cloud input
@cloud input can to be used to define variables directly on the Techila Workers without making them defined in the local workspace. This is useful in reducing the amount of input data that needs to be transferred from your computer to the Techila Server when creating a Project.
In the following example, variables a, b are defined directly on the Techila Worker.
using Techila
@cloud reset
loops=10;
global result=zeros(1,loops);
@cloud output result
@cloud var loops
@cloud input a=1
@cloud input b=4
@cloud for counter=1:loops
  result[counter]=counter*counter+a+b;
end
2.8. @cloud const
@cloud const works similarly as @cloud var, with the exception that the local workspace variable will be of type const.
2.9. @cloud output
@cloud output needs to be used to list all output variables that you want to return to your computer from the Techila Workers. Please note that you will also need to declare all returned variables as global. In the following example, variables result and result2 are returned.
using Techila
@cloud reset
loops=10;
global result=zeros(1,loops);
global result2=zeros(1,loops);
@cloud output result
@cloud output result2
@cloud var loops
@cloud for counter=1:loops
  result[counter]=counter*counter
  result2[counter]=counter*counter+1
end
When defining output variables, it is also possible to define a reduction operator that will be used to combine the result data. In the example below, all returned result variables will be summed, generating value 55 as the final result.
using Techila
@cloud reset
loops=10;
global result;
@cloud (output, +) result=0
@cloud var loops
@cloud for counter=1:loops
  result=result + counter
end
2.10. @cloud reset
@cloud reset resets all previously created @cloud macros. If you are making changes to your application (meaning adding and removing @cloud macros), it is recommended to @cloud reset between runs to prevent previous configurations from causing problems.
using Techila
@cloud reset
loops=10;
global result=zeros(1,loops);
global result2=zeros(1,loops);
@cloud output result
@cloud output result2
@cloud var loops
@cloud for counter=1:loops
  result[counter]=counter*counter
end
3. Code Examples
This Chapter contains walkthroughs of the example material that uses the @cloud macro included in the Techila SDK.
The example material used this Chapter, including Julia-scripts and data files can be found in the subfolders under the following folder in the Techila SDK:
techila\examples\julia\cloudfor\<example specific subfolder>
Please note that the example material in this Chapter is only intended to highlight some of the available features in cloudfor. For a complete list of available control parameters, execute the following command in Julia.
using Techila
@cloud help
3.1. Controlling the Number of Jobs
This example is intended to illustrate how to convert a simple, locally executable for-loop structure to a distributed loop structure using the @cloud macros. Executable code snippets are provided of a locally executable loop structure and the equivalent cloudfor implementation. This example also illustrates on how to control the number of iterations performed during a single Job.
The material used in this example is located in the following folder in the Techila SDK:
techila\examples\julia\cloudfor\1_number_of_jobs
Please note that when using @cloud to distribute a loop structure, the maximum number of Jobs in the Project will be automatically set to match the number of iterations in the loop structure. For example, the loop structure below contains 10 iterations, meaning that the maximum number of Jobs in the Project would be 10.
@cloud for counter=1:10
  <executable code>
end
3.1.1. Locally Executable Program
The locally executable program used in this example is shown below.
# Copyright 2018 Techila Technologies Ltd.

function local_loops(loops)
    # Locally executable code. Contains two perfectly nested loops,
    # which will be distributed in the @cloud version.

    # Create a local array for the results.
    result=zeros(1,loops);

    # Using a for-loop, square the loop counter index and store results
    # in the 'result' variable
    for counter=1:loops
        result[counter]=counter*counter;
    end
    return(result);
end
The code contains a single for-loop, which contains a single multiplication operation where the value of the i variable is squared. The value of the i variable will be replaced with the iteration number, which will be different each iteration. The result of the multiplication will be stored in the result vector at the index determined by the value of the i variable.
The locally executable program can be executed by changing your current working directory in Julia to the directory containing the material for this example and executing the commands shown below:
include("local_loops.jl")
result = local_loops(10)
Executing the command shown above will calculate 10 iterations. The values stored in the result-array are shown in the image below.

3.1.2. @cloud Version
The @cloud for version of the locally executable program is shown below.
# Copyright 2018 Techila Technologies Ltd.

# Make functions in the Techila package available.
using Techila;

function run_loops(loops)
    # @cloud version of the code. Contains a @cloud for -loop
    # to distribute computations.

    # Reset any previous cloud macros to ensure we get a clean environment.
    @cloud reset

    # Create an array for the results and mark it as global.
    global result=zeros(1,loops);

    # Mark the output variable as an output variable so it will be returned
    # from the Techila Workers to your computer.
    @cloud output result

    # Mark the loops for transfer to the Techila Workers. Without this, we
    # would get an error about an undefined variable.
    @cloud var loops

    # Specify that we want to perform 2 iterations in each Job.
    @cloud param stepsperjob=[2]

    # Create the computational Project using @clouf for
    @cloud for counter=1:loops
        result[counter]=counter*counter;
    end

    return(result);
end
The command using Techila will be executed when the file is sourced. After executing the command, the functions in the techila package will be available.
The number of iterations performed in each Job is set to 2 with the following parameter in the code:
@cloud param stepsperjob=2The for-loop in the locally executable version has been prefixed with @cloud, which means that the code should be executed in the Techila Distributed Computing Engine (TDCE) environment. In this example, the executable code block only contains the operation where the value of the i variable is squared.
The result of the multiplication will be stored in the result vector at the index determined by the value of the i variable, similarly as in the locally executable version. However, as this operation will performed on the Techila Worker, it means that the modified result vector will exist on the Techila Worker and needs to be transferred back to the End-User’s computer for post-processing. This has been achieved by defining the result vector as an output argument with the @cloud output macro, which will automatically ensure that the modified result vector is returned from the Techila Workers and imported to End-User’s Julia environment.
Additionally, the result vector has been declared as global variable. This needs to be done in order to ensure that the result post-processing on your computer works as intended.
In order to successfully perform the computations on the Techila Worker, several variables have also been prefixed with @cloud var macro. This will ensure that the variables will also be available on the Techila Workers when the operations inside the @cloud for loop are processed.
3.1.3. Creating the computational project
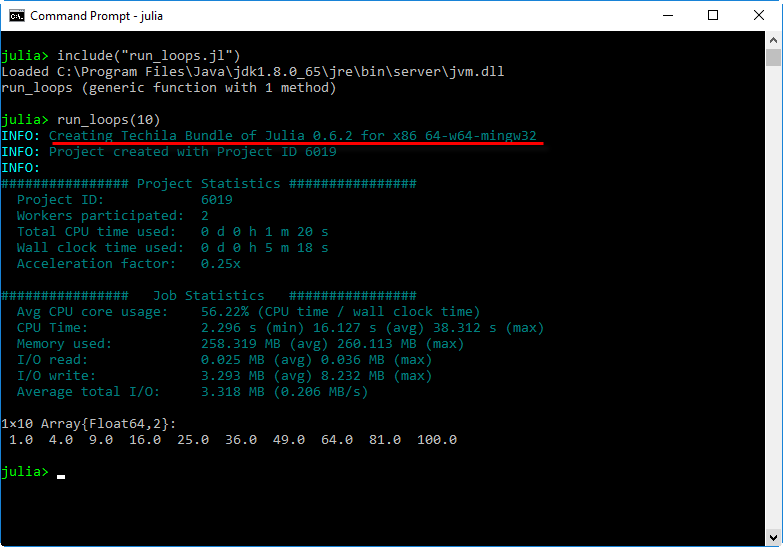
The computational Project can be created by executing the @cloud for version of the program. The @cloud for version can be executed by changing your current working directory in Julia to the directory containing the material for this example and executing the commands shown below:
include("run_loops.jl")
result = run_loops(10)
If this example is the very first Julia code you are running in your Techila Distributed Computing Engine environment, then there will be an additional delay while the system creates a Runtime Bundle from your Julia installation. This will only happen once. After the Julia bundle has been created, the Bundle will be stored on the Techila Server and will be distributed to all participating Techila Workers as needed.
After you have executed the command, the Project will be automatically created and will consist of 5 Jobs. Each Job will process 2 iterations. These Jobs will be assigned and computed on Techila Workers in the TDCE environment.
Each time a Job has been completed, a result file will be transferred to your computer. The values stored in the result files will be read and stored in the result vector. This array will contain all the values from the iterations and will correspond to the output generated by the locally executable program discussed earlier in this Chapter.
3.2. Perfectly Nested For Loops
In situations where the computationally intensive part of you code is located inside perfectly nested for loops you can used nested @cloud for loops when distributing the computations. This example demonstrates how distribute a simple, local program consisting of two perfectly nested for loops.
The material used in this example is located in the following folder in the Techila SDK:
techila\examples\julia\cloudfor\2_nested_loops
3.2.1. Locally Executable Program
The locally executable program used in this example is shown below.
# Copyright 2018 Techila Technologies Ltd.

function local_nested_loops()
    # Locally executable code. Contains two perfectly nested loops,
    # which will be distributed in the @cloud version.

    # Create local variables
    dimen = 10;
    result=zeros(dimen,dimen);

    # Run the code locally.
    for x=1:dimen
        for y=1:dimen
            result[x,y]=x*(y+1);
        end
    end
    return(result);
end
The code contains a two, perfectly nested for-loops. which contain a single arithmetic operation. The values of the x and y variables will be replaced with the values of the iteration counters, which will be different each iteration. The result of the operation will be stored in the result array at the indices determined by the value of the x and y variables.
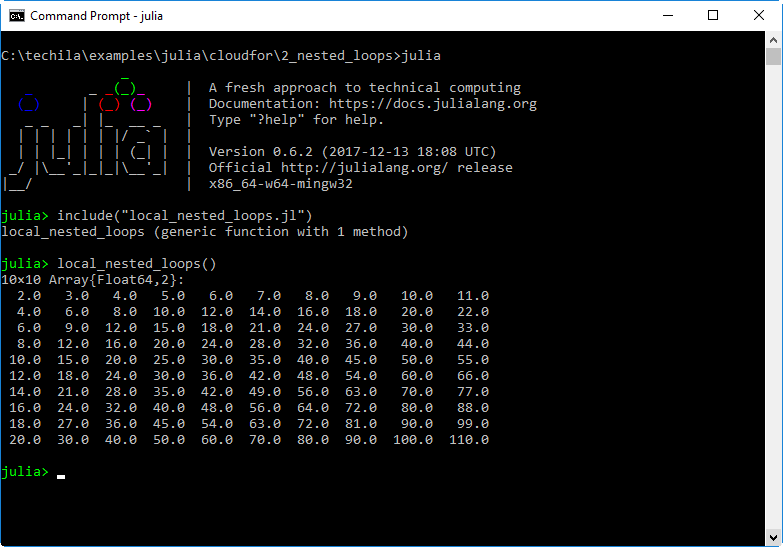
The locally executable program can be executed by changing your current working directory in Julia to the directory containing the material for this example and executing the commands shown below:
include("local_nested_loops.jl")
result = local_nested_loops()
Executing the command shown above will calculate 100 iterations in total. The values stored in the result-array are shown in the image below.
3.2.2. @cloud for Version
The @cloud for version of the locally executable program is shown below.
# Copyright 2018 Techila Technologies Ltd.

# Make functions in the Techila package available.
using Techila;


function run_nested_loops()
    # @cloud version of the code. Uses two perfectly nested @cloud for loops
    # to distribute computations.

    # Clear any previous @cloud macros
    @cloud reset

    # Define dimension
    dimen = 10;

    # And mark the dimen variable as something that is needed during computations
    @cloud var dimen

    # Create a global variable for the results
    global result=zeros(dimen,dimen);

    # And mark which variable contains the results
    @cloud output result

    # Define how many steps will be performed in each job. Outer loop split into
    # five iteration chunks and inner loop to max 3 iteration chunks. This sets
    # the Job count in the Project to: ceil(10/5) * ceil(10/3) = 2 * 4 = 8 Jobs.
    @cloud param stepsperjob=[5,3]

    # Create the Project.
    @cloud for x=1:dimen
        @cloud for y=1:dimen
            result[x,y]=x*(y+1);
        end
    end
    return(result);
end
In the distributed version, the two for-loops have been replaced with @cloud for-loops. This can be done because the loops are perfectly nested and the operations do not have any recursive dependencies.
Each @cloud for loop has the same amount of iterations: 10. This means that total number of iterations is 10 * 10 = 100. The number of iterations executed in each Job is defined by using the @cloud param stepsperworker=[5,3] parameter. This means the total number of Jobs in the Project is: ceil(10/5) * ceil(10/3) = 8 Jobs. Each Job will process a subset of iterations. For example, Job #1 would process 5 iterations (x=1:5) of from the outer loop from the outer loop and 3 iterations (y=1:3) from the inner loop.
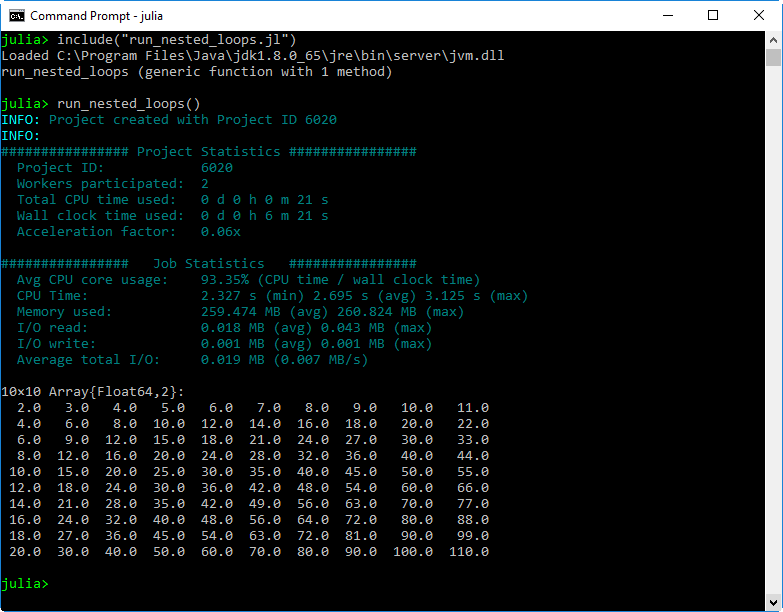
3.2.3. Creating the computational project
The computational Project can be created by executing the @cloud version of the program. The @cloud version can be executed by changing your current working directory in Julia to the directory containing the material for this example and executing the commands shown below:
include("run_nested_loops.jl")
result = run_nested_loops()
After you have executed the command, the Project will be automatically created and will consist of 8 Jobs. These Jobs will be assigned and computed on Techila Workers in the TDCE environment. Each Job will compute a subset of the total iterations in the loop structures.
Each time a Job has been completed, the result file will be transferred to your computer. The values stored in the output files will be read and stored in the result-array. This array will contain all the values from the iterations and will correspond to the output generated by the locally executable program discussed earlier in this Chapter.
3.3. Using Functions and Packages
Custom functions and/or functionality from Julia packages are typically needed in any moderately complex applications. This example demonstrates how you can make additional functions and/or packages available during computational Projects.
The material used in this example is located in the following folder in the Techila SDK:
techila\examples\julia\cloudfor\3_functions_packages
This example uses the StatsBase package. If you do not have them installed, please installe them before continuing.
using Pkg
Pkg.add("StatsBase")
3.3.1. Locally Executable Program
The locally executable program used in this example is shown below.
# Copyright 2018 Techila Technologies Ltd.

# Make StatsBase available locally.
using StatsBase;

function local_functions_packages()
    # Locally executable code. Contains a single for loop, which will
    # execute a custom function.

    # Create local variables
    dimen = 10;
    result=zeros(1,dimen);

    # Run the code locally.
    for counter=1:dimen
        result[counter]=custom_function(counter,10);
    end
    return(result);
end

function custom_function(x,y)
    result = x + y + StatsBase.rand(1)[1];
    return(result);
end
The code contains a single for-loop, which contains a call to a function named custom_function. This custom_function is defined in the same source code file. This custom_function uses functionality from the StatsBase package, which in turn has been made available with a using StatsBase statement at the very beginning of the source code file.
The locally executable program can be executed by changing your current working directory in Julia to the directory containing the material for this example and executing the commands shown below:
include("local_functions_packages.jl")
result = local_functions_packages()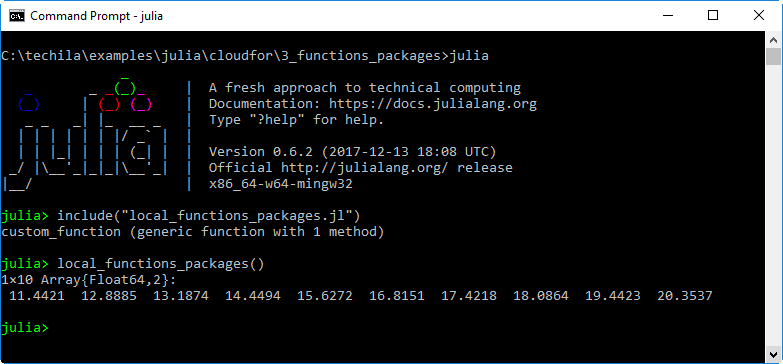
3.3.2. @cloud for Version
The @cloud for version of the locally executable program is shown below.
# Copyright 2018 Techila Technologies Ltd.

# Make functions in the Techila package available.
using Techila;

# Reset any previous cloud macros to ensure we get a clean environment.
@cloud reset

# Make StatsBase available on the Techila Workers.
# This could also be placed inside the 'run_functions_packages' function
@cloud exec using StatsBase;

function run_functions_packages()
    # Techila code. Will create a Project where custom functions and additional
    # packages will be used on Techila Workers.

    # Create variables and make them available on Techila Workers
    @cloud var dimen = 10;

    # Create a global variable for the results
    global result=zeros(1,dimen);
    # And mark it as an output variable
    @cloud output result

    # Run the code in Techila.
    @cloud for counter=1:dimen
        result[counter]=custom_function(counter,10);
    end
    return(result);
end

# Prefixing the function definition with a "@cloud exec" statement will make
# the function available on the Techila Workers.
@cloud exec function custom_function(x,y)
    result = x + y + StatsBase.rand(1)[1];
    return(result);
end
Because the function custom_function resides inside the @cloud for loop, we will need to make the function available on the Techila Workers as well. This can be done by placing an @cloud exec statement before the actual function definition.
The custom_function will need access to the StatsBase package, which in turn means that the StatsBase package will need to be made available on the Techila Workers. This can be done by prefixing the using StatsBase statement with a @cloud exec macro. This will transfer the package from your computer to the Techila Workers where it will be automatically imported to the Julia workspace with a using StatsBase command, making all functionality in the package available for use during the computational Job.
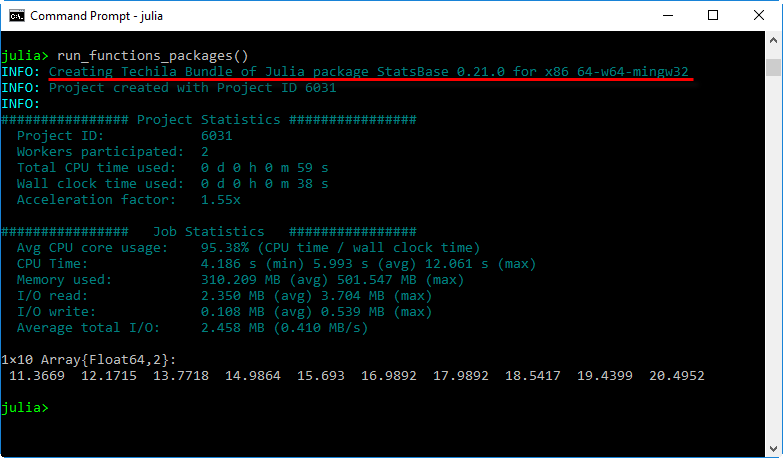
3.3.3. Creating the computational project
The computational Project can be created by executing the @cloud version of the program. To create the Project, change your current working directory in Julia to the directory containing the material for this example and execute the commands shown below:
include("run_functions_packages.jl")
result = run_functions_packages()
After you have executed the command, the Project will be automatically created and will consist of 10 Jobs. The StatsBase package will be stored in a Bundle and transferred from your computer to the Techila Server, which in turn will distribute it to all Techila Workers that will be assigned Jobs belonging to the Project.
Each time a Job has been completed, the result file will be transferred to your computer. The values stored in the output files will be read and stored in the result-array. This array will contain all the values from the iterations and will correspond to the output generated by the locally executable program discussed earlier in this Chapter.
3.4. Using Data Files
In situations where your input data is stored in files you can use two different approaches to make the data available on Techila Workers:
-
Option 1 Read the file locally, store the contents to a variable and mark the variable for transfer with a
@cloud varprefix. -
Option 2 Transfer the file to Techila Workers and read the file on the Techila Worker.
This example illustrates how to apply the approach described in Option 2 to determine how many times specific names appear in a tabular data set which is stored in a file.
Note! This example uses the DataFrames and CSV packages. If you do not have them installed, please installe them before continuing
using Pkg
Pkg.add("DataFrames")
Pkg.add("CSV")
The material used in this example is located in the following folder in the Techila SDK:
techila\examples\julia\cloudfor\4_data_files
3.4.1. Locally Executable Program
The locally executable program used in this example is shown below.
# Copyright 2018 Techila Technologies Ltd.

# If needed, uncomment and install packages:
# Pkg.add("DataFrames")
# Pkg.add("CSV")

# Make necessary packages available locally.
using DataFrames, CSV;

function local_data_files()
    # Locally executable code.

    # Specify which file contains the data.
    filename = "sampledata.csv";
    # And read the contents of the file.
    data = CSV.read(filename,DataFrame)

    # Specify a list of names that will be searched from the data.
    names_of_interest = ["Wat", "Rory", "Banky"];

    # Count how many names we have.
    dimen = length(names_of_interest);

    # Create an array of DataFrames for the result data.
    result = Array{DataFrames.DataFrame,1}(undef,dimen);
    # And fill it with empty dataframes.
    fill!(result, DataFrame());

    # Run the code locally.
    for id=1:dimen
        name = names_of_interest[id];
        # Get lines that match the name that is being processed.
        subdata = filter(data2 -> data2[:first_name] == name, data);
        # Store matching rows as a DataFrame in the array.
        result[id]=subdata;
    end
    # Return the results.
    return(result);
end
The code starts by importing the DataFrames and CSV packages, which gives us a nice selection of functionality for processing tabular data.
The data in this example is stored in a file called sampledata.csv. The file contains 1000 rows of data, each line containing a name and an age of a hypothetical person. After reading the file, the data will be stored in variable data.
The names_of_interest variable will contain three arbitrarily chosen names. The for loop will access the names in the list by using an index and determine which lines contain the name currently being searched. After getting all matching lines, a DataFrame containing the matching lines will be stored in the Result array.
The locally executable program can be executed by changing your current working directory in Julia to the directory containing the material for this example and executing the commands shown below:
include("local_data_files.jl")
result = local_data_files()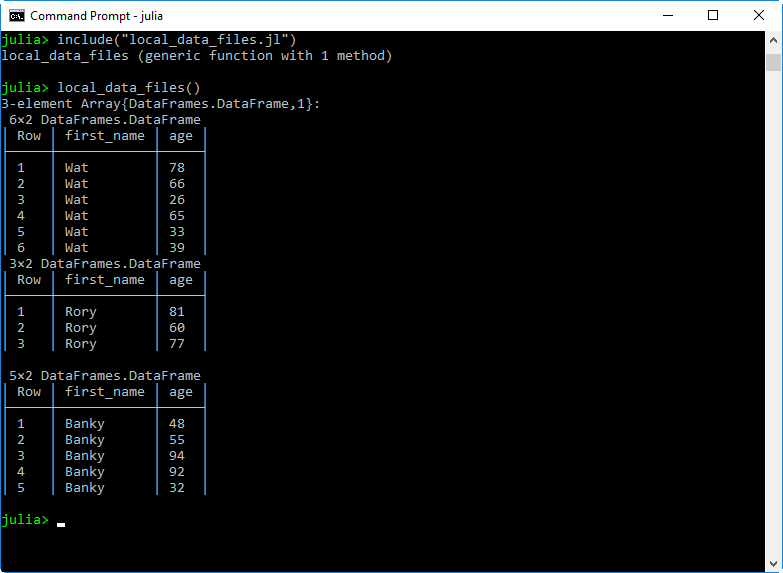
3.4.2. @cloud for Version
The @cloud for version of the locally executable program is shown below.
# Copyright 2018 Techila Technologies Ltd.

# If needed, uncomment and install packages:
# Pkg.add("DataFrames")
# Pkg.add("CSV")

# Make functions in the Techila package available.
using Techila;

# Reset any previous cloud macros to ensure we get a clean environment.
@cloud reset

# Make necessary packages available in Techila.
@cloud exec using DataFrames, CSV

function run_data_files()
    # @cloud version of the code. Transfers the file to Techila Workers by
    # using @cloud file macro.

    # Define variables and make them available by prefixing with a @cloud var
    # tag.

    @cloud var names_of_interest = ["Wat", "Rory", "Banky"]
    @cloud var filename = "sampledata.csv"
    @cloud var dimen = length(names_of_interest)

    # Transfer the file sampledata.csv to Techila Workers. On the Techila Worker,
    # this file will be stored in the same temporary working directory that is used
    # to process the Job. This means you will be able to load it without any path
    # definitions.
    @cloud file "sampledata.csv"

    # Mark the result variable as global.
    global result = Array{DataFrames.DataFrame,1}(undef,dimen);
    # Fill with empty DataFrames
    fill!(result, DataFrame());
    # Mark the result variable as something we want to return from the Job.
    @cloud output result

    # Run the code in Techila.
    @cloud for id=1:dimen
        # Read the files on the Techila Worker
        data = CSV.read(filename,DataFrame)

        # Check which name we are searching for.
        name = names_of_interest[id];

        # Get lines that match the name that is being processed.
        subdata = filter(data2 -> data2[:first_name] == name, data);

        # Store matching rows as a DataFrame in the array.
        result[id]=subdata;
    end
    # Return the results.
    return(result);
end
In the code shown above, the operations in the @cloud for loop will be performed on the Techila Workers. The amount of iterations is determined by the number of names in the list. As the list contains 3 names, it means there will be 3 Jobs.
As the file will be read on the Techila Worker, functionality for reading and processing the file will need to be made available on the Techila Worker. This has been done by using the following @cloud exec statement, which transfers the necessary packages to the Techila Worker.
@cloud exec using DataFrames, CSVIn this example, the file sampledata.csv has been marked for transfer with the following syntax.
@cloud file "sampledata.csv"After the file has been transferred to the Techila Worker, the file will be stored in the same temporary working directory that is used to process the Job. This means the file can be accessed without any additional path definitions.
3.4.3. Creating the Computational project
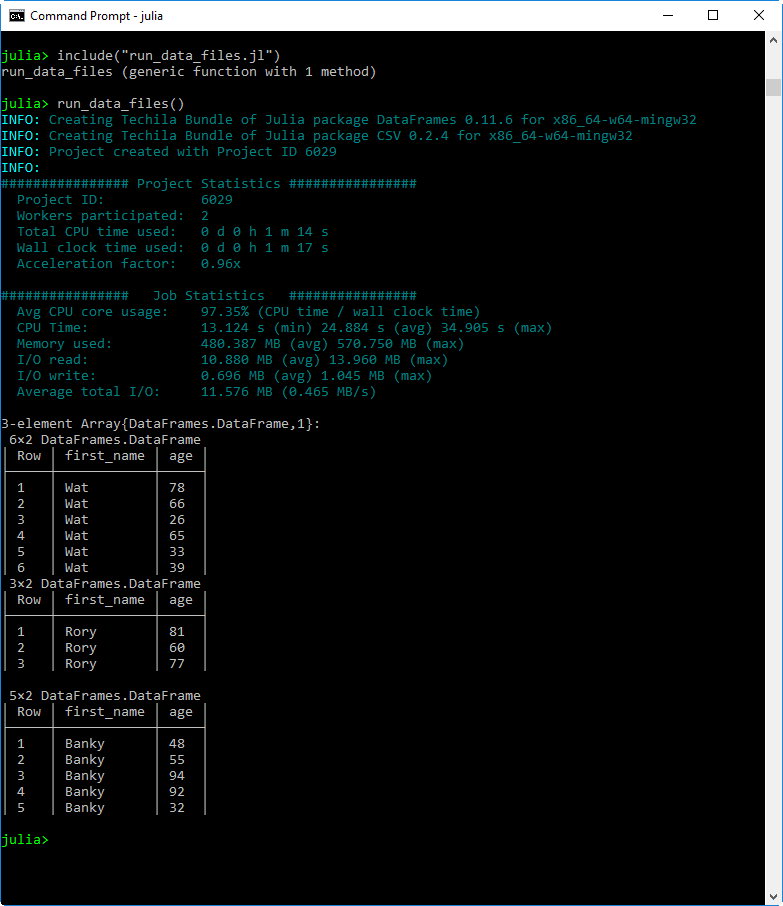
The computational Project can be created by executing the @cloud version of the program. To create the Project, change your current working directory in Julia to the directory containing the material for this example and execute the commands shown below:
include("run_data_files.jl")
result = run_data_files()
After you have executed the command, the Project will be automatically created and will consist of 3 Jobs. Any necessary packages (CSV,DataFrames and any dependencies) will be stored in Bundles and transferred from your computer to the Techila Server. Additionally, the sampledata.csv file will be stored in a Bundle and transferred. The Techila Server will then distribute these Bundles to all Techila Workers that will be assigned Jobs belonging to the Project.
During each Job, the file sampledata.csv is loaded and stored in the data variable. Please note that no path definitions are needed when loading the file, as it is stored in the same temporary working directory that is used to run the Julia code.
Each time a Job has been completed, the result file will be transferred to your computer. The values stored in the output files will be read and stored in the result-array. This array will contain all the values from the iterations and will correspond to the output generated by the locally executable program discussed earlier in this Chapter.
3.5. Callback Functions
Callback functions can be used to post-process Job result data as soon as it has been received from the Techila Worker. Before a callback function can be used, it need to defined by the End-User. The function can perform any operation the End-User desires, but the function signature must meet the requirements described in @cloud <callback> for. This example illustrates how a simple callback function can be used to process results.
The material used in this example is located in the following folder in the Techila SDK:
techila\examples\julia\cloudfor\5_callback
3.5.1. Locally Executable Program
The locally executable program used in this example is shown below.
function cbfun(id,result,loops,dimen)
    pivalue_tmp = 4 * (result / (id * loops));
    approximation_error = pi - pivalue_tmp;
    tmsg = string("Processing result #", string(id), " of ", string(dimen)
                  , ". Approximation error: ", string(approximation_error));
    println(tmsg);  # Print progress information
 end

function mcpi(loops)
    # Function for checking how many randomly generated points are inside a
    # unitary circle. Can be used to approximate the value pi.

    mcpi_result = 0; # No random points generated yet, init to 0.

    for i = 1:loops # Monte Carlo loop from 1 to loops
        if ((sqrt(rand() ^ 2 + rand() ^ 2)) < 1) # Point within the circle?
            mcpi_result = mcpi_result + 1; # Increment if the point is within the circle.
        end
    end
    # Return the number of points inside the unitary circle.
    return(mcpi_result);
end


function local_callback()
    # Define how many iterations (100) will be performed and how many random
    # number samples are generated in each iteration.
    dimen = 100;
    loops = 100000000;

    # Create arrays for result data.
    result = 0;  #

    # Run the code locally.
    for id=1:dimen
        # Keep cumulative count of the points generated inside the unitary
        # circle.
        result = result + mcpi(loops);

        # Print some progress information and the amount of approximation
        # error.
        cbfun(id,result,loops,dimen);
    end

    # Calculate the final value for the pi approximation.
    pivalue = 4 * (result/(dimen * loops));

    # Return the result.
    return(pivalue);
end
The code contains three functions:
-
local_callback- Function used to calculate an approximate value of Pi. -
cbfun- Function used to print progress information about the approximation process. -
mcpi- Function containing the Monte Carlo routine for approximating the value of Pi.
The local_callback function contains a single for loop. Inside this for loop, the code will execute the mcpi function, which generates a number of randomly generated points and calculates how many of these points are located inside a unitary circle. As we know how many points in total were generated (loops), we can use this information to calculate an approximate value of Pi. Every time this function is executed, the result variable will be updated to contain the cumulative sum of points generated during the for loop iterations.
After executing the mcpi function, the function cbfun will then be executed and will display progress information and the current amount of approximation error.
The locally executable program can be executed by changing your current working directory in Julia to the directory containing the material for this example and executing the commands shown below:
include("local_callback.jl")
result = local_callback()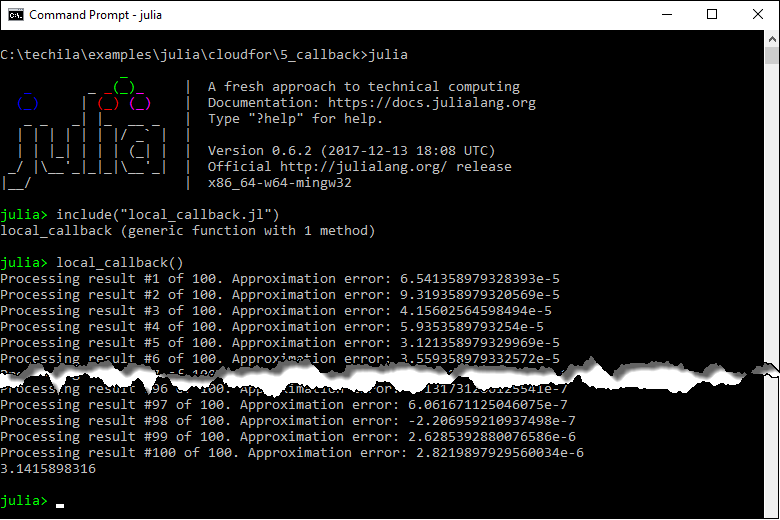
3.5.2. @cloud for Version
The @cloud for version of the locally executable program is shown below.
# Copyright 2018 Techila Technologies Ltd.

# Make functions in the Techila package available.
using Techila;

# Reset any previous @cloud macros.
# Needs to be done at the start of the file so it does not reset the
# @cloud exec statement used to export the 'mcpi' function definition.
@cloud reset

function cbfun(jobresult)
    # Define globals needed in the function
    global dimen;
    global loops;
    global counter;
    global cumulative_results;

    # Keep count how many results we have received.
    counter = counter + 1;

    # Store cumulative sum of Job results in the global variable so
    # it persists between callback function calls.
    cumulative_results = cumulative_results + jobresult["result"];

    # Calculate current approximation of value pi.
    pivalue_tmp = 4 * (cumulative_results / (counter * loops));
    # Calculate the approximation error
    approximation_error = pi-pivalue_tmp;

    # Print progress status.
    tmsg = string("Processing result #", string(counter), " of ", string(dimen)
                  , ". Approximation error: ", string(approximation_error));
    println(tmsg);

    # Return the result in original format. This will be the result returned
    # from the Job This will not contain the cumulative sum used in the print
    # out above. The cumulative summation will be performed by using an
    # additional postprocessing routine.
    return(jobresult);
end

@cloud exec function mcpi(loops)
    # Function executed on the Techila Workers.

    mcpi_result = 0; # No random points generated yet, init to 0.

    for i = 1:loops # Monte Carlo loop from 1 to loops
        if ((sqrt(rand() ^ 2 + rand() ^ 2)) < 1) # Point within the circle?
            mcpi_result = mcpi_result + 1; # Increment if within the circle.
        end
    end
    # Return the number of points inside the unitary circle
    return(mcpi_result);
end

function run_callback()
    # @cloud version of the code. Will process computations on Techila Workers
    # and print progress information about the results by using 'cbfun'
    # function as a callback function.

    # Make these global so they can be accessed in the callback function.
    global dimen = 100;
    global loops = 100000000;

    # Also mark variables with @cloud var so that they can also be accessed
    # on the Techila Workers
    @cloud var dimen
    @cloud var loops
    # Create a global variable for result data.
    global result = 0;

    # And define an additional post-processing routine for the result data. In
    # this example, each Job result will be summed together. This has been done
    # to ensure the results are processed in a similar manner as in the local
    # version, where the 'result' variable is used to store a cumulative sum.
    @cloud (output, +) result=0

    # Create some global variables to be used in the callback function.
    global counter = 0;
    global cumulative_results = 0;

    # Run the code in Techila by using @cloud for.
    @cloud cbfun for id=1:dimen
        result = result + mcpi(loops);
    end

    # Calculate the approximated value of pi using the samples generated during
    # the Project.
    pivalue = 4 * (result/(dimen * loops));

    # Return the results.
    return(pivalue);
end
The distributed version contains three functions:
-
run_callback- Function used to create a computational Project using@cloud for. Also definescbfunas the callback function. -
cbfun- Function used to print progress information about the approximation process. Will be automatically executed each time a new Job result has been received. -
mcpi- Function containing the Monte Carlo routine for approximating the value of Pi. This will be executed on the Techila Workers during the Jobs.
The distributed version has the following key differencenses when compared to the local version.
The signature of cbfun function has been modified to accept one input argument. This is the requirement for all callback functions. All other parameters needed have been declared as global, which allows cbfun to access them during execution.
The cbfun function call has been moved from inside the loop structure to the actual line defining the loop:
@cloud cbfun for id=1:dimenThe cumulative sum inside the @cloud for loop has been implemented by defining the sum operator + in the output variable definition shown below. This line initializes the value as 0 and defines that all output values should be summed together. This has been done to achieve the same behavior as in the local version.
@cloud (output, +) result=03.5.3. Creating the Computational project
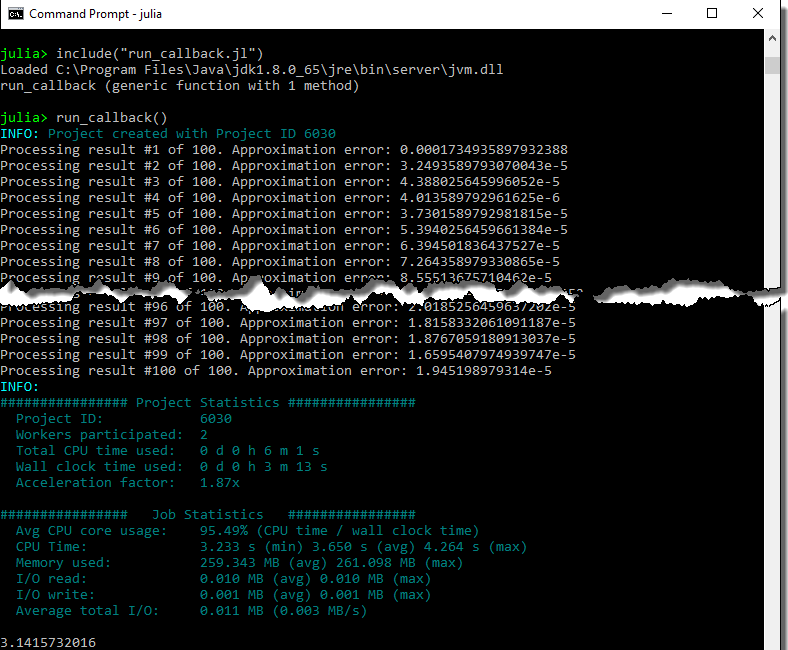
To create the Project, change your current working directory in Julia to the directory containing the material for this example and execute the commands shown below:
include("run_callback.jl")
result = run_callback()
After you have executed the command, the Project will be automatically created and will consist of 100 Jobs.
During each Job, the mcpi function will be used to generate a number of randomly generated points as defined by the loops argument.
Each time a Job has been completed, the result file will be transferred to your computer. After the file has been transferred, it will be automatically processed and the Job result will be passed as an input argument to cbfun, which will then be executed and will display progress information about the post-processing. Each time a new result has been received, a new line will be printed.
The result variables received from all Jobs will be summed together, similarly as in the locally executable version.
After the Project has been completed, the approximated value of Pi will be calculated and printed.